
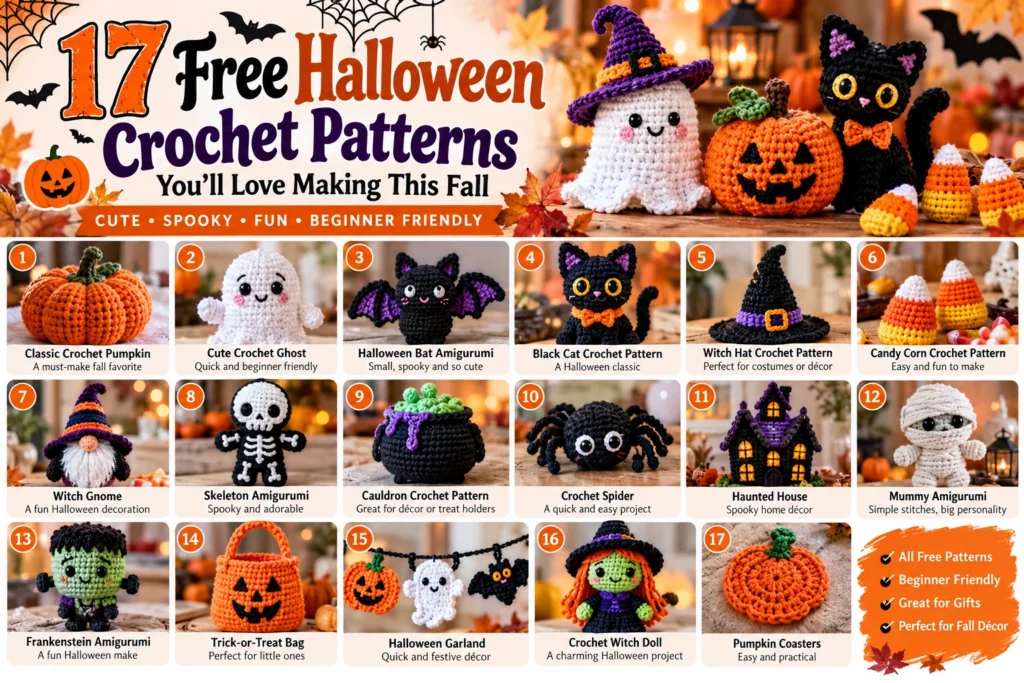
There is something irresistible about making Halloween decorations with a crochet hook and a few leftover balls of yarn. One evening you are stitching a tiny pumpkin; the next, a whole family of friendly ghosts has taken over your bookshelf. If you are looking for free Halloween crochet patterns, this collection brings together 17 fun projects, from easy amigurumi to festive home décor and a useful trick-or-treat tote.
Rather than offering vague inspiration alone, I have included a link to a free pattern or free-pattern collection for each idea, along with practical tips on yarn, stitches, shaping, and finishing. Follow the linked designer’s full instructions for exact stitch counts, gauge, and assembly: the notes below are a guide to choosing and preparing your project, not a substitute for each designer’s pattern.
Table of Contents
Before You Start: Supplies and Basic Stitches
You can make many small Halloween decorations with scraps of worsted-weight yarn, a hook that suits your yarn, scissors, stitch markers, and a yarn needle. Stuffed amigurumi also needs polyester filling. Choose orange, cream, black, green and purple for a traditional palette, or try blush, ivory and sage for a softer autumn style. Each linked pattern has its own recommended hook and yarn; use those details if you want a similar finished size.
Common US crochet abbreviations include ch (chain), sl st (slip stitch), sc (single crochet), hdc (half double crochet), dc (double crochet), inc (increase), and dec (decrease). A stitch marker is particularly helpful for spiraling amigurumi rounds. Count each round as you go; it is much easier to correct one missed increase immediately than after ten more rounds.
17 Free Halloween Crochet Patterns to Try
1. Tiny Crochet Pumpkin
A cheerful pumpkin is an ideal first seasonal make. Choose orange worsted yarn and a slightly smaller hook than the yarn label suggests if you are making a stuffed version. Most round pumpkins begin with a magic ring, increase to the widest point, work even rounds, and decrease before stuffing. The ribbed look comes from pulling a long yarn tail around the outside in several evenly spaced sections. A green stem and curling vine finish the look.
Skill level: Beginner. Pips the Pumpkin free PDF.
2. Glow-in-the-Dark Ghost
White yarn, black embroidery thread, and a little stuffing make a friendly ghost that looks adorable on a shelf. The body usually starts as a rounded head, then continues into a wider lower section. A scalloped edge gives the ghost its floating shape. Keep your single crochet stitches tight enough that stuffing cannot escape. Glow yarn is optional; ordinary cotton works beautifully too.
Skill level: Beginner. Repeat Crafter Me ghost and tiny pumpkin.
3. Little Halloween Bat
For a pocket-sized bat, make the rounded body first, then two identical wings. Mark the same attachment points on either side so the wings sit level. Purple, charcoal or classic black yarn all work. Embroidered eyes give a sweet expression; narrow embroidered fangs make it a little spookier. Wings may need light blocking to lie flat.
Skill level: Confident beginner. Oscar the Little Bat free PDF.
4. Candy Corn Decoration
The familiar cream, orange, and yellow bands make candy corn instantly recognizable. For a stuffed version, keep your color changes at the same point in each round to create neat stripes. If you prefer a flat ornament, work a triangular shape in rows and add a hanging loop. Use small leftover balls of yarn and embroider a smiling face if you like.
Skill level: Beginner. Cute Candy Corn free PDF.
5. Spider and Web Ornament
A tiny spider is especially fun hanging from a long crocheted chain. Make a compact black body, then add eight legs with chains or securely sewn strands. For a web, use chain spaces between simple crochet rounds; pin the finished piece into shape while blocking. Keep any hanging cords away from very young children.
Skill level: Easy. Free spider, ghost, and pumpkin video pattern.
6. Pumpkin Patch Garland
Crochet several small pumpkin motifs and join them with a chain to decorate a mantel or doorway. Repeat one motif for a coordinated look, or alternate pumpkin colors such as rust, cream, and muted sage. Before joining, lay all motifs out and decide the spacing. Attach each piece firmly so it hangs facing forward.
Skill level: Beginner. Halloween pennants and decorations collection.
7. Ghost Granny Square
A ghost motif can turn a basic granny square into a seasonal coaster, blanket block or bag panel. Work the ghost motif or chart first, then add square-shaped rounds in a contrasting color. Count stitches at every corner and block finished squares to matching dimensions before joining. This is a good next step for crocheters comfortable with basic granny squares.
Skill level: Intermediate. Ghost granny square instructions.
8. Bubbling Cauldron Granny Square
A bubbling cauldron square is a playful way to use lime green, purple, and black yarn together. Work the design following the original square instructions, paying special attention to color placement and corner counts. Make a single square into a wall hanging, or repeat it for a dramatic Halloween cushion front.
Skill level: Intermediate. Bubbling cauldron granny square.
9. Black Cat Halloween Toy
A black cat is a lovely alternative to traditional orange decorations. Use black or charcoal yarn, add pointed ears and finish the face with embroidered eyes and whiskers. If you are crocheting a stuffed toy, sew the ears and tail on securely and keep the stuffing even. Try yellow or green eyes for extra Halloween personality.
Skill level: Confident beginner. Black cat patterns in the free roundup.
10. Mini Witch Hat
A miniature witch hat can decorate a pumpkin, a doll or a Halloween table setting. The cone is generally shaped with gradual increases, while the brim expands more quickly to form a flat circle. Check the pattern’s round counts carefully; increasing too fast makes the cone flare. Purple ribbon or a tiny buckle is a charming finishing detail.
Skill level: Easy. Free witch hat pattern in the roundup.
11. Crochet Skull Coaster
Skull coasters add a spooky touch without taking up much yarn. Cotton is a sensible choice for drink coasters because it is absorbent and washable. Follow the designer’s instructions for the eye openings and jaw shaping; these details are important to the silhouette. Block the finished coaster flat before using it.
Skill level: Intermediate. Skull coaster instructions.
12. Halloween Treat Tote
A reusable crochet treat bag is both decorative and practical. For a sturdy bag, use firm cotton yarn and work the base tightly before building the sides. Reinforce the handle joins, and avoid very open stitches if the bag will hold small sweets. Our own Halloween tote tutorial explains the bag-making process in more detail.
Skill level: Confident beginner. Our Halloween crochet tote bag tutorial.
13. Mummy Plush
Cream-colored wraps and a pair of embroidered eyes give a simple stuffed shape a funny mummy personality. Use a plain stuffed body as the base and attach narrow crocheted strips or embroidered bandage lines. Secure every end on the inside where possible. This is a great project for practicing neat finishing rather than complicated stitches.
Skill level: Easy. Free mummy plush pattern.
14. Frankenstein-Inspired Monster
Green yarn, a dark hairline and a few embroidered stitches are enough to suggest a classic friendly monster. Choose a pattern with clearly explained shaping for the head and body. Stitch on facial features before closing the piece when possible, because it is easier to hide the thread ends.
Skill level: Confident beginner. Free monster pattern in the roundup.
15. Bat Garland
A line of small bats makes a bold window or party decoration. Flat bat motifs work especially well because they hang without much weight. Crochet all the bats with the same hook and yarn weight, block the wings, and join them along a strong cord with generous spacing. Alternate black and deep purple for a softer look.
Skill level: Easy. Bat garland instructions.
16. Spiderweb Window Decoration
Open lace is perfect for a web that catches the light. Work the chain-space rounds loosely enough to open up, but keep each repeat consistent. Blocking matters here: pin every point of the web to a flat surface and let it dry fully before hanging. Use fabric stiffener only if the yarn and intended use allow it.
Skill level: Intermediate. Spider web decoration pattern.
17. Halloween Pennants
Crocheted pennants are a satisfying way to decorate a party on a budget. Make matching triangles, add simple Halloween colors or appliqués, then connect the pieces with a long chain. Cotton or acrylic yarn both work for indoor bunting. Test the spacing by laying the bunting flat before securing the ends.
Skill level: Beginner. Free Halloween pennants PDF.
How to Choose the Right Halloween Project
If you are new to crochet, start with a pumpkin, candy corn motif or simple pennant. These are forgiving shapes, and you can practice the basics without committing to a large project. Once you feel comfortable reading a pattern, try a stuffed ghost or bat. More detailed granny squares, lace webs and shaped skull coasters are better when you already know how to maintain stitch counts.
Think about how you want to use the finished item, too. Cotton works well for coasters and sturdy bags, while soft acrylic can be pleasant for plush toys and decorations. For a quick gift, choose a small ornament; for a whole-room transformation, make several repeated motifs into bunting. Small projects are also wonderful stash-busters, but remember that changing yarn thickness changes the finished size.
Tips for Neat, Beginner-Friendly Results
Check your tension. Amigurumi fabric should be dense enough to conceal stuffing, while lace decorations need enough openness to show their shape. Do not force one hook size onto every project.
Keep track of rounds. Place a marker in the first stitch of a spiral round, move it up as you work, and write down the last completed round if you put the project away.
Finish carefully. Use a yarn needle to weave ends through several stitches, attach wings and ears securely, and block flat pieces where the pattern recommends it. Embroidered features are preferable to plastic safety eyes for items intended for babies or very young children; even safety eyes can detach.
Respect the original designer. Free does not mean copyright-free. Use the linked instructions for personal making and check each designer’s terms before reproducing a pattern or selling finished pieces. Some links go to a curated collection: select the named design there to open its free instructions or PDF.
More Crochet Ideas for After Halloween
If you enjoy making bags, try our beginner crochet tote bag tutorial to practice a sturdy base and handles. For a colorful project that uses up small yarn leftovers, visit our granny square shoulder bag pattern. You can also explore our crochet pattern collection for more inspiration throughout the year.
Frequently Asked Questions
Are these Halloween crochet patterns really free?
Yes. Every entry links to a free pattern, free video, or collection offering the named free design. Some websites may ask you to select a free PDF or open the full instructions on a separate page; paid ad-free versions may also be offered.
What is the easiest Halloween crochet project for beginners?
A simple pumpkin, candy corn motif or bunting pennant is a good place to start. These teach repeatable stitches and basic shaping without lots of assembly.
How long does a small crochet ghost take?
It depends on your experience, yarn and pattern. A small ghost may take an evening, while larger or more detailed plushies can take longer. Read the pattern before estimating your time.
Can I use leftover yarn?
Absolutely. Many ornaments use only small amounts of each color. For a consistent set, keep yarn weight and hook size the same across matching pieces.
What if I cannot make a magic ring?
Many amigurumi patterns allow a small chain ring as an alternative. Follow the designer’s instructions and close the center as tightly as possible to prevent a hole.
Make Your Halloween Crochet Projects Look Like a Matching Collection
A few thoughtful choices can make seventeen very different ideas feel like they belong together. Start with a limited palette of three or four main yarn colors and one accent. Traditional orange, black, cream and purple is always fun, but you could also combine warm rust, oatmeal, olive and charcoal for decorations that stay out well into November. Lay your yarns side by side in daylight before starting, especially when using scraps from different brands.
Repeat one detail across several projects. You might embroider the same tiny smile on a ghost, pumpkin and bat, or use matching cream hanging loops on every ornament. If you are making a garland, work the motifs in the same yarn weight so that no single piece looks unusually heavy. For stuffed pieces, aim for a similar firmness when filling each one; overstuffing can distort the stitches and hide the intended shape.
A Simple Weekend Crochet Plan
On Friday evening, gather your materials, choose three patterns and read the instructions all the way through. Make sure you understand whether the designer uses US or UK stitch terms, since the same abbreviation can describe different stitches. Print the pattern or keep the page open where you can check it without losing your place.
On Saturday, begin with the quickest motif, such as candy corn or a pumpkin. This gives you time to test the yarn and practice any unfamiliar stitch. Move on to a ghost or bat once you have settled into your tension. If the pattern involves separate wings, ears or stems, make all matching pieces before sewing anything together.
Use Sunday for finishing. Weave in the ends, embroider faces, attach components and block any flat shapes. Arrange your finished decorations where they will be displayed and take a photo so you remember which colors worked well together. If you plan to give items away, include a little note with the yarn fiber and basic care advice.
Care, Storage and Safety
Check the yarn label before washing handmade pieces. Many acrylic and cotton yarns can be washed gently, but stuffing, embellishments and glued decorations may require different care. Air-dry thoroughly before storing, especially if you intend to pack the decorations away for a full year. Keep flat lace pieces protected from bending and avoid crushing stuffed shapes under heavier items.
For hanging décor, secure loops carefully and position long strings or cords out of children’s reach. Use battery-operated lights rather than open flames around yarn. Crochet toys with small parts are not automatically suitable for young children; if a piece is intended for a baby or toddler, use an age-appropriate pattern and secure embroidered features instead of detachable embellishments.
Final Thoughts
My favorite thing about Halloween crochet is how easy it is to make a little seasonal magic from yarn you already own. Start with one pumpkin or ghost, then let the collection grow as you find your rhythm. Whether you are decorating your home, preparing party favors or making a handmade gift, these free halloween crochet patterns give you plenty of charming places to begin. Save this list for your next cozy crochet evening, and visit the original designers for the complete patterns.